I have no idea if anyone else will find this helpful, but I’m so excited about it that I have to share it1. One of the most time-consuming and repetitive tasks in blogging is uploading images to my Amazon S3 account, generating the CDN link, and inserting it into the post. But I’ve now cobbled together a recipe that makes this really easy, and I’d like to tell you about it. First, here are the ingredients you’ll need:
- An Amazon S3 account for image storage (optional: Cloudfront CDN)
- TextExpander to handle the repetitive typing
- Hazel to automate the upload to S3
- Dropbox isn’t technically necessary, but it makes everything just a little bit smoother.
With that said, here are the steps in the recipe:
Step 1: Set up a Hazel workflow to upload new files to S3
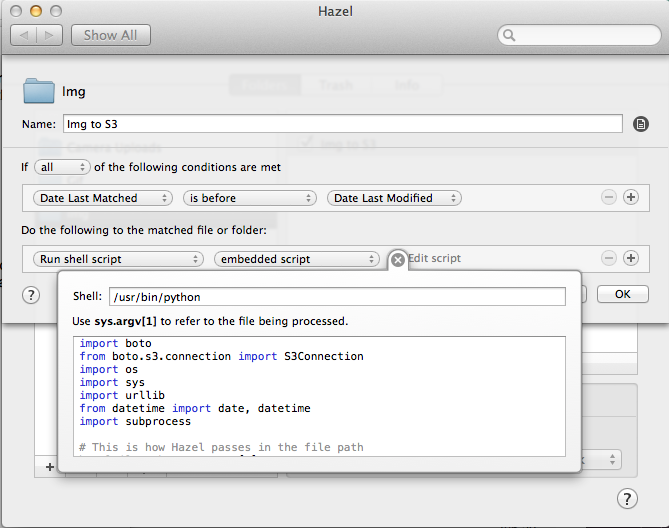
First, we need to set up Hazel to watch a folder and upload any new files to your S3 bucket. The Macdrifter article Upload to Amazon S3 from Dropbox using Hazel is extremely helpful for this. I basically copied that script with some minor adjustments. Here’s what it looks like:

Note that you have to change the type of shell script you run to /usr/bin/python. The script I use looks as follows (again, see the Macdrifter article for the whole story):
import boto
from boto.s3.connection import S3Connection
import os
import sys
import urllib
from datetime import date, datetime
import subprocess

# This is how Hazel passes in the file path
hazelFilePath = sys.argv[1]

# Obviously, you'll need your own keys
aws_key = 'YOUR_KEY'
aws_secret = 'YOUR_SECRET'

# This is where I store my log file for these links. It's a Dropbox file in my NVAlt notes folder
logFilePath = "/Users/~YOUR_COMPUTER_NAME/Dropbox/Notational/Link_Log.txt"
nowTime = str(datetime.now())

# Method to add to clipboard
def setClipboardData(data):
    p = subprocess.Popen(['pbcopy'], stdin=subprocess.PIPE)
    p.stdin.write(data)
    p.stdin.close()
    retcode = p.wait()

# This is the method that does all of the uploading and writing to the log file.
# The method is generic enough to work with any S3 bucket that is passed.
def uploadToS3(localFilePath, S3Bucket):
  fileName = os.path.basename(localFilePath)

  # Determine the current month and year to create the upload path
    today = date.today()
    datePath = today.strftime("/%Y/%m/")

   # Create the URL for the image (Add your own path here)
    imageLink = 'https://cdn.elezea.com/images/'+urllib.quote(fileName)

    # Connect to S3
    s3 = S3Connection(aws_key, aws_secret)
   bucket = s3.get_bucket(S3Bucket)
   key = bucket.new_key('images/'+fileName)
   key.set_contents_from_filename(localFilePath)
   key.set_acl('public-read')
   logfile = open(logFilePath, "a")

   try:
       # %% encode the file name and append the URL to the log file
       logfile.write(nowTime+'  '+imageLink+'n')
      setClipboardData(imageLink)
   finally:
      logfile.close()

# Add your bucket name here.
uploadToS3(hazelFilePath, 'YOUR_BUCKET_NAME')
Here’s what the script does in my case: Whenever I add a new file to the Img folder in Dropbox, it uploads the file to S3, copies the URL to the clipboard, and also adds that URL to a Link_Log text file in my nvALT folder for later access if needed (or if I add multiple images in one go).
Step 2: Set up TextExpander shortcuts
Once the image is added to S3, the rest is handled with TextExpander. When I want to add an image to a blog post I type:
,img
That expands to:
<p><img style="display: block; margin-left: auto; margin-right: auto;" title="%fill:image title%" src="%|%fill:image source%" border="0" alt="%fill:image title%" /></p>
It asks me to give the image an alt tag, and then it places the cursor where I’m going to add the source file. Since the source URL is already in my clipboard, I then just ⌘-V and I’m all set.
They call it magic
That’s it. It might seem like a lot of work, but now that everything is set up my workflow is extremely simple:
- Add new image to the Img folder
- Type the TextExpander shortcut and paste the Image URL where I want the image to appear
I think it’s going to save me at least as much time this year as it took to write this blog post.
Oh. Wait.